How to Replace a Toilet Flapper
A toilet flapper controls the water between the toilet tank and the toilet bowl. Without it, you won’t be able to flush the toilet and the tank won’t also fill up. A faulty one is both an annoyance and a waste of water (and money in the process). Signs that it is faulty include running toilet or hearing water leaking into the toilet bowl and toilet flushing on its own.
A toilet flapper in a good working condition should be watertight such that water doesn’t freely flow into the toilet bowl when you’ve not flushed the toilet. It also must close fast enough after flushing to prevent water from the mains from flowing directly into the toilet bowl.
The following are the general steps to replace the flapper for common toilet types, Kohler and American Standard toilet
Steps to Replace Flapper for most Toilets
Most toilets will make use the following procedure for replacing a toilet flapper:
1. Turn off the shutoff valve
First, you need to completely shut off the flow of water into the toilet tank. This can be done by shutting it off from the shutoff valve. For a majority of toilets, the shutoff valve is located on the lower side of the wall with a metal or plastic valve jutting off from the wall connecting to a pipe leading upwards into the toilet tank. You then turn it in a clockwise direction until it stops turning.
If the valve is stuck, add a penetrant like WD-40 or other suitable one, give it 5 to 10 minutes then try turning it. If you’re forced to use a tool such as a pair of pliers to open it, you should wrap it up with a piece of cloth to avoid damaging its look. If this doesn’t work, you have to shut off the water from the mains to the whole house.
After shutting it off from the shutoff valve or the mains, you might still hear water trickling down the drain for a while. This is usually just the water stuck in the pipes and should stop after a while. If it goes on for longer, it means you haven’t completely shut it off.
2. Empty the toilet tank
To empty the toilet tank, you should flush the toilet as usual (using the lever). However, you first need to remove the lid on the toilet tank to have access to the mechanisms inside of it. As you flush the toilet, you can then flush the toilet to get rid of the water in it.
In this state, you can also observe the flapper to see how it behaves. A good flapper ought to open to allow water to flow to the toilet bowl then close completely when you release the lever.
It should also close fast enough not to allow water to continue flowing to the bowl after you’ve stopped flushing it. You should also check whether it’s the toilet flapper that has an issue or the chain is stuck or some other issue. If it’s the flapper that’s faulty, head over to the next steps.
In this stage also, keep the flapper open for a while longer by holding the flush lever down a while longer to completely empty the tank.
3. Remove the flapper valve from the toilet
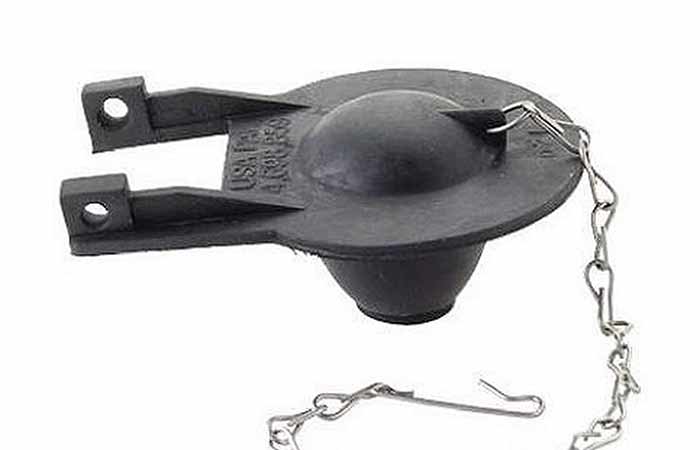
The flapper of your toilet is the rubber or plastic piece that covers the hole leading from the toilet tank to the pipe that drains into the toilet bowl. It opens up when you flush it to allow the water to flow to the toilet bowl and closes when the flushing stops thus allowing the water to fill up the toilet tank.
The flapper is connected to the rest of the toilet in two places namely with two clips on the lower side of the overflow tube, and on a chain connected to the flushing lever. To remove it, you first unclip the chain from it then the two clips on the overflow tube. The clips can just be pulled apart to release the flapper.
Some flappers especially the ones made of rubber or plastic can become disintegrated by salt water and can fall apart when removing them. For this reason, you should remove the flapper with lots of care lest the debris drops into the drain hole and blocks the hole.
4. Prepare the new flapper
If you haven’t already done so, buy a replacement toilet flapper similar to the one you removed from the toilet. To avoid buying the wrong one, carry the one you have to the store and buy one exactly like it.
If it’s made of other types of materials, you need to buy a rubber one since the flexibility in it will help provide a better seal than the stiffer materials like plastic or even metal.
If you’re not sure what flapper to get for your toilet, ask the attendant at the store as they have the best knowledge on this.
Once ready with your flapper, unwrap it in readiness for the installation phase. You should also use a fine-grit piece of sandpaper to clean the area around the hole so that the new flapper gets a watertight seal when installed.
5. Install the new flapper
Start by sliding the clips of the new flapper to the provisions on either side of the overflow tube. Ensure the clips are secure enough to avoid coming off after flushing the toilet several times over. After that, clip on the lift chain on the loose end of the flapper. The flapper should be balanced enough to keep it steady and in position to open and close the drain hole smoothly.
6. Adjust the flushing chain
There is a delicate balance on the length of the chain linking the toilet flapper and the flushing lever. It shouldn’t be so tight that it leaves the drain hole open as this will lead to leaks into the toilet bowl even when you’ve not flushed it. On the other hand, it shouldn’t be so loose that the flapper doesn’t fully open when the toilet is flushed.
You can work on this by ensuring the ring at the end of the lift chain touches or hovers above the bottom of the tank when the flapper is closing the drain hole.
7. Test the workings of the new flapper
If you’re sure of the clippings and the length of the flushing chain, let the water into the tank by opening the shutoff valve. You’ll have to turn it in a counterclockwise direction until it can’t turn anymore then let the toilet tank fill up.
As the tank fills up, check the toilet bowl for any water leaking down to it. If there isn’t any water flowing to the bowl, it means the flapper is providing a watertight seal over the drain hole which is a good thing.
If there is a leak, it means you made the flushing chain too tight such that there’s some space between the flapper and the drain hole. Adjust it accordingly by loosening it up.
You then flush the toilet and check how fast it fills up and the power of the flush. The toilet bowl should be filled immediately you flush it and with enough force to flush down anything in the bowl. After that, the toilet tank ought to fill in under a minute (mostly 30 to 45 seconds) without a leak.
If everything is okay, replace the toilet tank lid and use the toilet as usual.
Replace Toilet Flapper on a Kohler Toilet
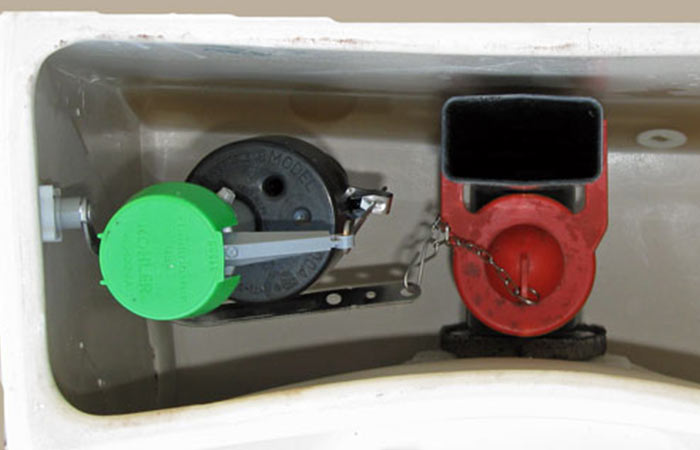
Kohler toilets have different types of toilet flappers as they use the canister style flush valve. This one can be replaced as follows:
- Shut off the water inlet into the toilet tank at the shutoff valve like in the procedure above.
- Remove the lid off the top of the tank to access the inside of the toilet tank where the refill tube is.
- Flush the toilet to empty the water from the tank for easier working.
- Identify the guide which is located in the center of the canister then turn it ¼ way in a counterclockwise direction. The canister guide is the black tube where the small white refill tube leads to.
- Slowly lift the canister out of the toilet tank.
- Check for the location of the S-hook on the flapper chain then the location of the flapper bar mounting groove which is located on the back of the flush valve.
- Disconnect the S-hook from the end of the trip lever arm then remove the existing flapper. You can get rid of the old flapper.
- Pull off the yellow or red seal from the bottom of the canister then replace it with a new one if it’s faulty.
- Check for the same groove on the back of the flush valve that was used by the previous flapper. Having the prongs on the bar pointing towards the back of the toilet tank, slowly slide the bar into the flush valve from the side. After that, center the bar on the flush valve then rotate it such that the prongs point upwards.
- Follow this up by attaching the arms of the flapper to the ends of the bar. After this attachment, the flapper ought to freely move up and down the body of the flush valve.
- Reinstall the S-hook to the flapper chain in the same location as the original flapper then attach the S-hook to the trip arm lever. Make sure the tension in the chain is enough to allow flushing and closing the drain hole.
- Reinstall the canister by lining the tab on the bottom of the canister guide with the slot of the flush valve then rotate it clockwise to lock the canister in place.
- Turn on the water supply then check whether there are leaks and the flushing is correct.
With these few steps, your Kohler toilet will have a new flapper and seal.
How to Replace Toilet Flapper: American Standard
The American standard toilet, also called the Accelerator Flush Valve, can be replaced in the following steps:
- Shut off the water at the shutoff valve.
- Flush the toilet to drain the toilet tank for easy working. Hold down the flushing lever to completely drain the tank of water.
- Remove the lid off the toilet tank to access the inside.
- Press down the trip lever then remove the clevis pin from the trip lever rod. You may need to use a needle nose pliers to get a better grip.
- Carefully detach the trip lever rod from the flush valve.
- Loosen the flapper from its attachment points. You can also replace the flapper seal in this stage.
- Insert then tighten the flush valve chain back on to the flapper.
- Install the new flapper onto the same position like the old flapper.
- Reinstall the trip lever rod followed by the clevis pin.
Just like that, you have a new flapper and seal for your American standard toilet.
Toilet Flapper Maintenance Tips
Once you have replaced the toilet flapper or in your normal use of the toilet, practice the following to keep in good condition:
Always use flappers in good working conditions
A faulty flapper, as stated earlier on, will cost you money by wasting your water besides annoying and scaring you when the toilet flushes itself frequently. For these reasons, you need to only use a flapper in the right working conditions. Replacing or fixing a faulty flapper is much easier and cheaper when compared to paying higher bills and dealing with annoyances of a leaking toilet.
You can tell that your toilet flapper has an issue when notice a hissing sound of the tank continuously refilling itself, water ripples in the bowl, and low flushing power. As most toilet flappers last for about 3 years, you’ll need a new one each 3 years.
Check the areas around the flapper
At times, a leaking toilet can be caused by the other parts of the toilet and not necessarily the flapper. One such part is the flushing chain. If it gets stuck say after flushing the toilet, it can shorten the chain making the flapper less effective at sealing the drain hole. This will lead to a leak as well.
Another part that can lead to a leak is a faulty valve seal seat. This is the rubber ring right under the ball of the flapper which provides a resting place for the flapper. At times, due to exposure to water and normal wear and tear, the valve seal seat can be peeled off, worn out or split. This will let water flow to the toilet bowl even when the toilet hasn’t been flushed. For this issue, you should either get a new toilet seal seat or use a valve seal repair kit to fix it and make it watertight again.
Use the services of an expert
If you run into anything you don’t know, always consult an expert before you make a mess of your toilet.
FAQS
How much does it cost to replace a toilet flapper?
On your own, you can replace a toilet flapper for about $10 and in about 30 minutes. A plumber will charge you anything between $50 and $100 for the same work.
How often should you replace your toilet flapper?
A toilet flapper should be replaced every 2 to 3 years depending on the type and quality of the flapper, the frequency of use, and the saltiness of the water.