How to Replace a Broken Toilet Lever Arm/Handle
On average, the handle of the toilet is used approximately ten times a day. This means the handle is the most likely toilet compartment to wear out, break, or damage easily, compared to the other parts. And because of the force exerted as you push down the handle back and forth, the force can cause the handle to break especially if it’s made from plastic.
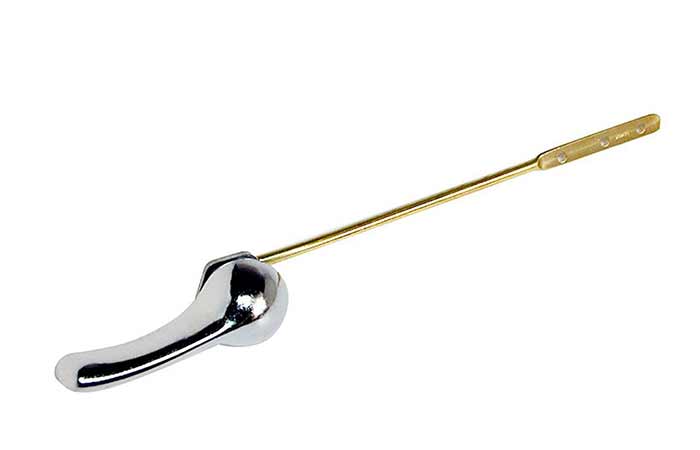
Replacing a handle doesn’t need much craftsmanship. You’ll need the basic adjustable wrench to tighten the bolts, a new set/ handle, and a guide. You start by taking off the old broken handle, clean up the opening where the handle is, and screw in the new handle.
In case you need a step-by-step guide, below is a detailed step by step method on how you can replace your broken toilet tank lever by yourself. Furthermore, there are tips to help you avoid replacing the handle again in the future.
Steps
The steps will be divided into two sections;
- Removing the old broken handle
- Replacing/ Installing the flush lever arm
Removing the Old Handle
Depending on whether you mind working with water or not, you can skip the first step. However, removing the water allows you to work better without splashing water to the floor now and then.
Supplies
- Adjustable wrench
- New handle
Method
- Turn off the water supply to the toilet either from the main shutoff valve or the supply valve to the toilet.
- Take the lid off to expose your tank. If you had closed your water supply, you can flush the toilet to remove the water in the tank. It shouldn’t refill afterward. If the handle isn’t working, lift the flapper chain to initiate the flush from inside the tank
- Locate the flush lever arm, handle, and flapper chain hooked to the arm and remove the chain from the hook on the flapper chain.
- The chain clasped could be a little hard to come off maybe because of rust but try to tilt it to the side to detach from the handle and lever.
- Now hang the clasped end of the chain over the side of the toilet or on the overflow tube of the fill pump so it’s easier to reattach later on.
- With a clear focus on the flush lever arm, locate the mounting nut on the opposite side of the handle and begin to unwind. Because it’s reverse thread, move clockwise to open/ loosen.
- If you can’t twist the nut yet, use an adjustable wrench to loosen the grip of the nut. You can also go with a pair of pliers. Unscrew the nut until where you can continue by hand.
- Unscrew to the end and remove it. Now pull out the old handle gently as you move sideways to allow the lever to pass through as well.
As you remove the handle, you may feel some resistance or stripping, in this case, you can cut through with a hacksaw. Also if you find the handle has a black rubber O-ring attached to them, use it to install the new handle. The O-ring will prevent leaks from coming through the handle.
Replacing/ Installing the New Handle
- Get your new handle and unwound the nut attached to it. Depending on the type of toilet you have, you can go to the local store for a universal handle or buy from your specific toilet brand. It should fit easily and you should be able to choose between metal and plastic.
- Take off the mounting nut and the O-ring if it had and insert the new handle in place. If they’re tightly wound, unscrew either pliers or a wrench.
- While the handle is in place, slide them back up the lever again to close.
- Confirm the handle is in place by leveling it against the chain flip.
- Now screw the O-ring and nut in place tightly in a counterclockwise direction. Guide the O-ring onto the lever first and slide it against the side of the tank. Then put the mounting nut on the lever until it holds the O-ring in place.
- Now keep turning the nut until it’s snug. Use a locking plier or the adjustable wrench to confirm so. Don’t overtighten as the handle will be too tense to flush.
- Once the handle is in place, take your chain and try and attach them to one of the holes on the arm rod. The end of the lever usually has 2-3 holes to reattach your chain clip. They have been kept in intervals so just choose the right hole that won’t feel too snug, nor loose.
- Loop on the chain at a distance of one inch (2.5 cm).
- Turn the water back on and let it refill the tank. Once full, test out the new handle.
- Check its tension and how smooth it feels. If it’s fine, cover the tank with its lid and you’re fine
Tips to Prevent Unnecessary Replacements of Flush Lever Arm
The handle is used now and then, which means repairs and replacements are inevitable. However, there are simple tips you could use to avoid having to spend more maintenance fees than you need on a replacement.
- Be gentle when flushing the toilet, more especially with plastic handles. This is because they are much more fragile than the metal brass kind.
- Check the arm extension of the handle as often as you can to confirm if its integrity is good.
- Do your due diligence when buying the handle set because you should choose something that’ll wear off easily or in just a few months.
- Fix the handle as soon as it gets loose and don’t tighten it too much.
- Replace the mounting nut often to keep the handle always tight and ready to flush.
- Conduct regular checkups in the toilet tank to check the tension of the flapper chain. It should exert too much pressure that may break the handle.
- Do not force the handle down once you feel the tension. Just open it up and check and fix the issue.
- Repair any other faulty toilet parts as soon as you notice they have become faulty.
- Replace old and worn-out toilet components to avoid overworking other parts.
Further Reading