Toilet Tank NOT Filling but Water Running
A fully functional toilet works in a continuous cycle. Once you flush, water leaves the tank into the bowl, simultaneously, the tank fills up with water up to its designated level awaiting the next flush, then, repeat the process. If the tank doesn’t fill up, there’s something wrong.
Water could be running but not filling up the toilet tank because of a faulty fill valve, afloat at the wrong height, a leaking flapper, a cracked overflow tube, or low water pressure in the tank. For all these issues, find out more about how you can identify the problem with your toilet and how you can fix it.
Possible Causes
Wrong Height of the Float
The float ball that sits on the water surface regulates how much water gets into the tank after a flush. It moves the float arm to shut the valve which then blocks the inflow of water into the tank.
If the float ball is set at a lower height, the tank will never reach its water level capacity. Therefore, you need to readjust the water level in the tank.
Faulty Fill Valve
The fill valve lies on the left side of the tank. Its work is to allow for water to get into the tank from the water supply line.
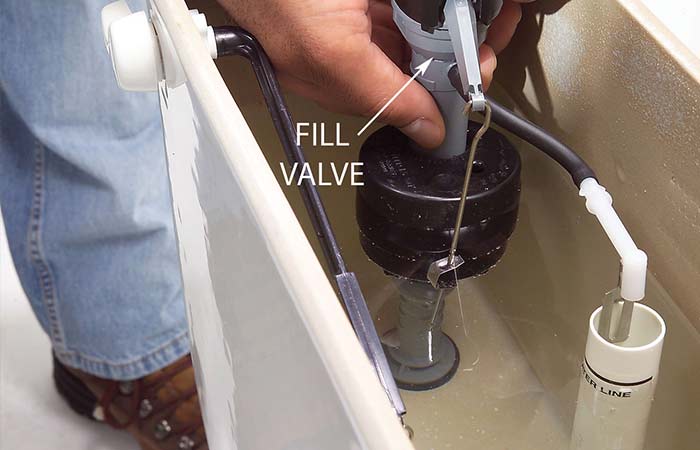
Hence, whenever you flush, the larger fill valve located at the bottom of the tank opens to allow water into the bowl, while the upper smaller valve opens allowing for a water refill.
Either valve could be constricted meaning the lower valve doesn’t close letting water continue draining into the bowl continuously, while the upper valve doesn’t allow for sufficient water to get into the tank. This is where you complain water is getting in slowly or with low pressure. More about this below.
Leaking Flapper
Also known as the flush valve seal, it’s a plug at the bottom of the drain that opens to allow water to drain through the lower fill valve into the bowl.
It will then close to let more water into the tank. Because its work is to seal the drain hole between flushes, the major issue would be its inability to provide a seal anymore.
The flapper could either be worn out hence stuck in an open position, or there could be tension in the chain causing it to remain raised.
Because the flapper connects to other compartments in the toilet such as the flapper chain and the flush lever, there could also be an issue with the trip assembly.
The handle could be stuck downwards, forcing the flapper to remain wide open, hence water from the fill valve just trickles down to the bowl.
Alternatively, there could be an issue with the length of the chain, being too tight or too loose can’t be good for the flapper
Low Water Pressure
The refill speed of water in your tank should be approximately ten to 20 seconds. But here’s a case water is getting into the bowl much slower and therefore not filling the tank properly.
Low water pressure can result from a leaking or rusted supply pipe, or a slightly closed fill valve. If the valve isn’t opened wide enough to allow for enough water to refill, it will continue to move at that slow speed.
Damaged Fill Tube/ Valve
The fill tube is a small hose that connects to a vertical tube called the overflow tube.
To know if it’s damaged, check if it’s unclipped from this tube as this will cause water to shut off supply before the tank is done refilling. It could also be damaged and worn out, this calls for a replacement.
Solutions
Now that you have an idea of what could be wrong with your toilet, let’s have a look at some of the solutions you could try.
Adjust the Toilet Float
Adjusting the float ball allows you to adjust the water level. So start by checking if you have a ball and arm float, or the cylindrical float that’s common in newer toilet models.
- Close the water supply to the toilet using the valve at the back of the toilet or the main shutoff valve to the house.
- Check the height of the float and note how much you need to fix.
- Flush the toilet to release the water and to lower the float.
- Hold the lever arm down and look for screws connected to the float. It could also be alongside the float.
- Use a screwdriver to turn it clockwise to raise the water level in the toilet tank. Don’t use too much force as this could break the nut, especially if it’s made from plastic. Ensure the float lays half an inch below the overflow tube.
- Open the supply valve and let water in. Check the height. If not satisfied, move to the next solution.
Repair or Replace the Fill Valve
The upper fill valve is located on the left side of the tank where you connect directly to the water supply line. It depends on the float to move up signaling water to refill and shuts as the float gradually rises.
The fill valve could wear out after some time, it could be filled with debris from the water supply pipe.
The accumulation will damage the valve inhibiting the good flow of water also causing low water pressure in the tank. At this point, you could repair or replace the fill valve.
Let’s start with the repair;
- Turn off the water supply to the toilet and empty the tank by flushing.
- Hold down the shaft of the fill valve and screw the fill valve cap counterclockwise to release it. Check for any debris, dirt, or build up. If any wash it out and make sure it’s clean before you return.
- Once clean, put the valve cap on and screw it on securely by turning clockwise. Keep turning till you’ve closed well.
- Open the valve and let water into the tank. Confirm the water pressure inside the tank.
- If still faulty, consider a replacement.
Replacing the fill valve;
- Start again by closing the water supply and flushing out the water.
- Remove the lock nut from the fill valve by turning counterclockwise. You could also remove the refill clip attached to the overflow tube
- Lift to remove the fill valve. Clean out the area removing any debris left.
- Slide in the new fill valve and screw in the lock nut. Once secure, connect the supply line
- Attach the refill tube to the overflow tube and watch as the water refills the tank.
- Water should get in with the right pressure and fill to the right height as well.
Replace the Toilet Flapper
The next thing you can do is to replace the flapper and the trip assembly if need be. The first thing you need to do is to open the lid to the tank and check the lift chain/ flapper chain connected to the flush lever arm.
The chain should be half an inch slack distance between the lever arm and the flapper at the bottom of the tank.
If the chain is too tight or if it hooks to another part of the toilet tank it is going to unseat the flapper, leaving your toilet to continuously run with water.
The chain shouldn’t also be lengthy as it could get into the flapper hole therefore not allowing it to close properly. Again, the toilet will be running continuously.
Lastly, check for debris around the location of the flapper. Sometimes buildup could be too much around the flush valve seal therefore not allowing it to seal properly.
For all these three cases, here’s what you need to do.
- Check inside the tank for the slack in the chain. All you need to do is to adjust the linkage to ensure it’s not too short nor too long.
- Measure half an inch of the chain and adjust accordingly. You could cut the excess chain so that it doesn’t tangle in the tank.
- Once corrected. Put the lid back on and flush the toilet.
- If unsatisfied, check the chain again and readjust while bending the rod slightly. That should fix the issue.
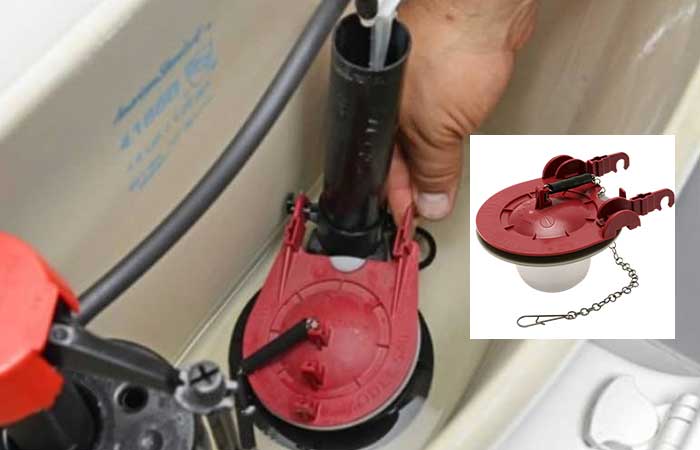
On the other hand, the flapper could easily be worn out and therefore it just can’t close the drain hole well, so instead of leaving the warped and old flapper on, you’ll have to replace it.
Head to the hardware store with your old type and ask for a replacement. This is important because flappers come in a wide variety.
Some flappers have a ring that goes over the tube, but most of them snap over the ears on the flush valve. If you choose the wrong one, it won’t flush the right way.
You could note the type of flapper it is and ask for the same kind or opt for a universal flapper or the adjustable kind, which offers room for changes as you replace it.
- Turn off the water supply to the toilet using either method.
- Flush the toilet and hold the lever down to make sure all the water drains into the bowl.
- Unhook the lift chain from the lever arm and attach somewhere else.
- Remove the pegs attaching the flapper from the overflow tube and lift it off.
- Clean the area to remove any debris before you can attach the new flapper.
- Install the flapper and connect it to the pegs of the overflow tube.
- Hook back the lift chain to the lever arm.
- Open the water supply to the toilet and check the stability of the flush seal valve. It should be steady.
If the flapper doesn’t work, you could go get another replacement then try the process again.
Replace the Overflow Tube
If the overflow is cracked or broken, it can also let water escape to the bowl. The large tube in the middle of the rank has to be replaced to restore a good working toilet condition. Shop at your local store for a well-fitting overflow tube.
When replacing, simply yank out the old and broken one and replace it with the new one. Remember to attach the refill tube to feed water to the tank.
Prevention Measures & Tips
To avoid the hustle of going through all these steps, here are great measures and prevention tips you can use to stay ahead;
- Regularly check the status of the toilet and its components to avoid these common issues.
- Once in a while, listen to the water pressure after you flush. Listen to how the tank is refilling to confirm it’s working well.
- Avoid flushing or handling the lever arm with too much pressure. The arm connects to a flapper chain and the flapper. Too much force can break its ability to maintain a seal at the bottom of the tank.
Check for repairs and replacements often. No matter how good the toilet is, the different compartments could be overworking causing them to wear and tear faster.
Replacing them could save you from all the guesswork when the toilet fails to work effectively.