Toilet Overflow Tube-What it is, Replacement & Problems
A toilet might face the risk of overflowing at any time and for this reason, there is a toilet overflow tube to regulate the amount of water in the tank. This toilet tank part ensures that the water in the tank is at the right level.
Read on to learn about the overflow tube, its function, how it works, replacement, and what to do if the overflow tube keeps running or not working properly.
What is the Toilet Overflow Tube/Pipe?
An overflow tube is a vertical tube inside the tank of a toilet that ensures surplus water from the tank does not spill onto the floor around the toilet by directing it into the bowl. It has a height of at least 1 inch (2.54 centimeters) below the opening of the tank lever.
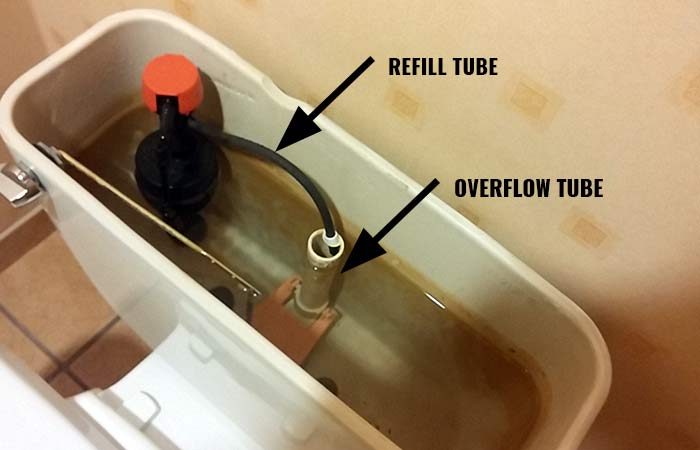
The overflow pipe and flapper, the part that covers the hole at the tank’s bottom when the tank is full, make up the toilet flush valve assembly, normally located in middle of the tank.
What does the Toilet Overflow Tube do?
Its sole purpose in the water tank is to move water into the bowl if the flush system malfunctions, to prevent water in the tank from overflowing especially when the fill valve does not turn off.
This tube is also the channel through which the float valve sends water to the bowl during the refill cycle.
When you press the flush lever, this pulls the chain that opens the flush valve. After this, the valve opens, then water pours into the toilet bowl.
Following a flush, the tank’s water level drops. The water immediately clears, and the tank begins to replenish. Some water from your fill valve flows through the refill tube and into the overflow tube when the tank fills.
The overflow tube’s duty is to send the water into your toilet bowl to prevent the tank from overflowing.
Toilet Overflow Tube Replacement.
At times the toilet overflow tube might be old or damaged hence not working properly. If this issue is not addressed early, it may cause more harm than good making you spend a lot on fixing it later.
If you want to replace the overflow tube you can just do it by yourself, fast and accurately or seek help from a professional plumber.
For this task, you need the following tools.: a plumber’s wrench which must have a wide mouth opening. The irwin pliers also have just enough of an opening to work, an adjustable crescent wrench, a flat head screwdriver, a pair of scissors, a bucket or a basin, a sponge or a rag or towels and a pair of rubber gloves
To replace a toilet overflow tube simply follow the steps shown below:
- Turn off the water supply system. There should be a shut-off valve in the wall behind your toilet. Gently turn the knob clockwise to shut the valve.
- Drain all the water from the water closet. To drain the water, you just flush the toilet.
- Then remove the lid to your tank. Set it in a safe place to avoid any damage.
- If there is still a lot of water in the bottom of the tank. Lift the flapper chain to drain the tank to the top of the flapper.
- For the small amounts of water that might remain in the water tank, you can use a towel or a piece of cloth or a sponge to drain it all out. Using a towel also helps in minimizing the spillage of water on the floor. If your tank refills, check if you have shut the water off completely.
- Once the tank is fully empty, we can start the process of replacing the overflow tube.
- Disconnect the water supply tube. To accomplish this, look underneath the tank to see where the water line feeds into the tank. Using a pair of pliers, loosen and then remove the coupling nut from the supply line.
- Place the basin or bucket underneath the supply line and gently remove the line from the bottom of the fill valve.
- Detach the chain from the lever rod inside the tank.
- Remove the rubber gasket by lifting the sides of the flaps
- Disconnect the water refill hose from the overflow tube by sliding the anchor hook up and off the overflow.
- Use your flat head screwdriver to lose the bolts at the bottom of the tank (on either side of the flapper.) You may need to reach underneath and hold the nut (or wing nut) with pliers as the bolt begins to loosen.
- Remove the rubber gasket in the center of the underside of your tank. You don’t have to remove everything from the tank.
- Remove the two bolts that hold the tank at the toilet base. Loosen the nut with the pliers or crescent wrench then remove it and the washer
- Grab the pliers and loosen the large plastic hex nut that was under the gasket. Then remove the nut and replace the flush valve assembly. Make sure it is sitting flush against the bottom of the tank.
- Then set your level up to the line indicated on the fill valve. Make a mark on the overflow tube one inch lower than the mark on the fill valve.
- Reassemble the parts then reconnect the water supply to the tank. Fill the tank, then flush the toilet to test if everything in order and working.
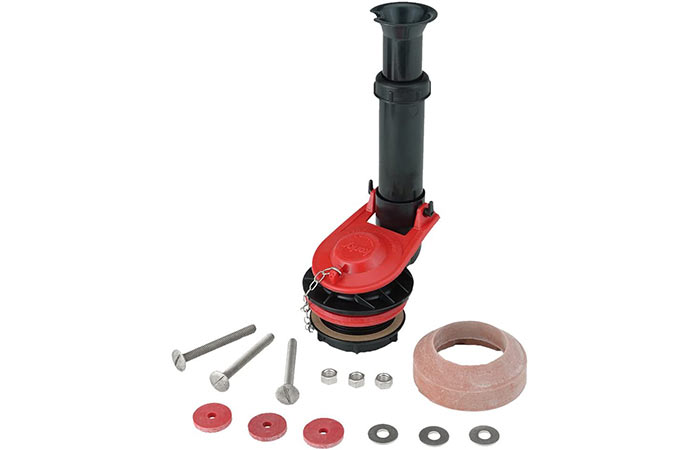
Some of the best overflow tube repair and replacement kits include;
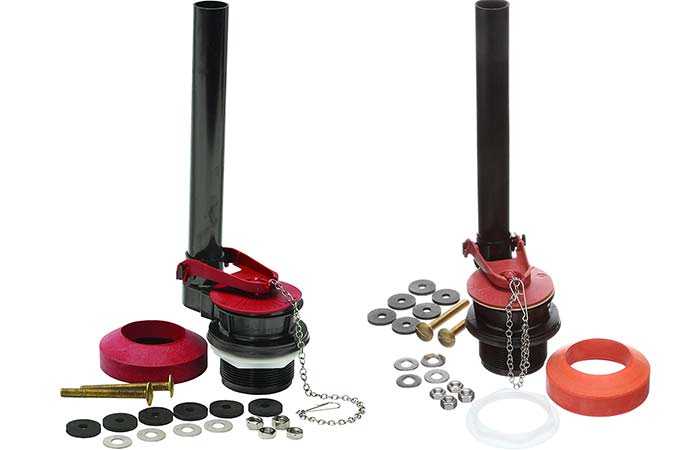
Lavelle 4030PK Korky 2-Inch Adjustable Flush Valve Kit with Tank-to-Bowl Gasket and Hardware.
Toilet Overflow Tube keeps Running
An overflow tube that keeps running is in most a problem linked to the height of the tube itself. When the toilet overflow tube is too short the water continuously flows into the tank and out of the overflow tube.
This can occur if the flush valve is incompatible with the toilet, or if during installation the overflow tube is cut too short.
If the overflow tube is too short, the only way to address this issue is to replace the flush valve. Just make sure that the new flush valve is compatible with your toilet and that the overflow tube is taller than the old overflow tube to prevent water from draining continuously.
In addition to a too short overflow tube, any of the following can make your keep running without stopping after the normal flush cycle
- Wrong float height
- The flapper is leaking and has to be replaced
- Too long refill tube
Follow the steps below to fix it.
Check the water level
The water level inside the toilet tank should always sit below the overflow tube and the fill valve to ensure that the water doesn’t continuously flow into the tank and out through the overflow tube.
Check the water level by removing the lid from the tank of the toilet and verify whether the water level is too high, causing it to run into the overflow tube.
If the water is running into the overflow tube, then the water level may need to be lowered, but if the water is not running into the overflow tube, then the issue is likely with the flush valve.
Adjust the Float Rod or Float Cup
To lower the water level inside the toilet tank, you simply adjust the float rod or float cup. To do this follow the following steps:
- Identify a float rod by the horizontal rod extending from the fill valve to a float ball. While a float cup is a small cylinder that wraps around the fill valve and slides up or down with the water level.
- The next step is, you need to locate the screw that attaches the float rod or float cup to the fill valve.
- Use a screwdriver, a set of channel locks, or pliers to turn this screw about a quarter-turn counterclockwise to lower the water level. Continue making adjustments until the water is no longer flowing into the overflow tube.
- If the water continues flowing, regardless of the position of the float rod or float cup, the issue is likely with the fill valve. However, if the water stops flowing, but the volume of water inside the tank is not enough to properly flush the toilet, then it’s likely that the overflow tube is too short for the toilet.
- Take note that water-logged floats can also cause constant running. If the float traps water in it, it should sit lower in the water and leave your float valve partially open. Check your float by unscrewing it (if applicable) and shaking it. Replace the float if you hear water inside.
Here we have dealt with a cracked/broken overflow pipe.
Another not uncommon problem is that of the valve failing to maintain the correct water level. Incorrect adjustment would be an obvious cause but finding this problem at home, I decided to investigate. Having figured out how to dismantle the diaphragm housing which was ‘twist-and-turn’ requiring rather more force that plastic parts should be subjected to, it turned out that the diaphragm was caked on bith sides with a thick green goo and yellowish crust. This I cleaned off with an old tootbrush, smeared the diaphragm with a whisker of petroleum jelly, reassembled, and so far looks good.
Incidentally, if the diaphragm is perished or otherwise in poor condition, it seems to be a job-and-a-half to find the right spare and even then , the price is heading for the better part of a complete new unit.
Thanks for the insightful ideas Jozef.