How to Tighten Loose Toilet Seat
It’s not unlikely for your toilet seat to wobble. The traffic of people sitting on the seat, constant closing and opening of the seat, plus just regular usage, the seat is bound to loosen over time. The bolts attaching the seat to the actual toilet have loosened in grip causing it to wiggle from side to side. Luckily, there’s a fix for that.
Whether you want to DIY or ask for professional help, tightening the toilet seat only requires you to tighten the bolts securing the seat. It’s quite simple. However, in some cases, you may find the bolts are damaged, hence not easy to tighten. In such a case, you simply replace the seat and screw it in properly.
There are many likely scenarios you may go through as you tighten your toilet seat. Following is a step by step guide on how you can do this procedure, plus how to use two different kits; the tightening kit and the stabilizer kit.
Tightening a loose Toilet Seat: Non-Concealed Fixings
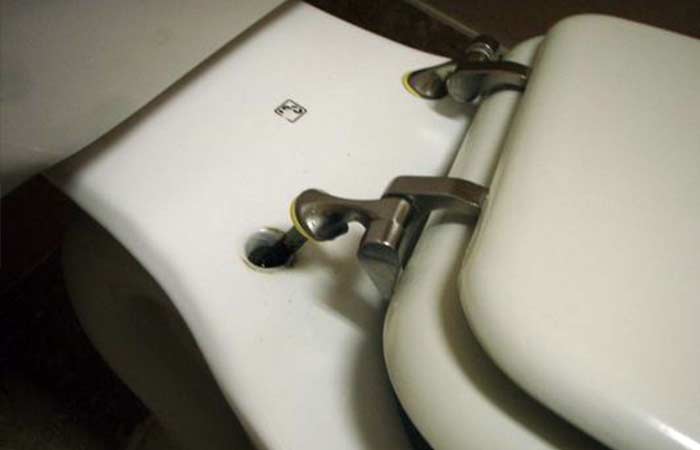
To start off, there are two types of seat covers; concealed and non-concealed. Non concealed simply means you can clearly see the tightening bolts and work on them.
However, concealed more often than not have caps covering the bolts meaning you have to work around them to remove the cap then tighten the seat.
In this first section, you will read about tightening toilet seats with non-concealed fixings. Here, there are also two ways to ho about it;
- Tightening the seat
- Replacement of the seat
Tightening the Seat
For tightening purposes, you only need to find the bolts and secure them properly. Here’s how; you’ll need
- Wrench – adjustable and ratchet
- Flathead screwdriver
- Toilet seat hinge washer (optional)
Method
- Locate the screws – normally, the screws will be clearly visible once you lift the toilet seat cover to expose the back section of the seat. You should see two long screws running through the porcelain and secured at the bottom of the seat by two nuts.
- Use the screwdriver to pry up the seat along with the cover. Be gentle with this process as you could risk breaking the screw (depending on the material used). Steel screws should have a problem, but cheaper toilets are made with plastic that is more inclined to break.
- After you’ve removed or loosened the seat altogether, level the seat to ensure it’s securely placed before starting to tighten. This way it won’t wobble even after tightening. Straighten the seat also ensures it aligns properly with the toilet bowl. Feel free to test it out.
- Once satisfied, begin to turn the screwdriver clockwise or the opposite of what you were doing previously. If there’s a nut at the bottom, hold it down with a cloth or with a spanner. Ensure it doesn’t move as you tighten. Seeing as there are different types of screwdrivers, select the best for the job. Too small means more friction, hence faster wear and tear. Too big won’t allow the screwdriver to fit.
- While clamping the nut underneath with pliers, spanner, or another tool, apply tension and keep turning. For you to notice something wrong you could unwind and repeat the process.
- Keep screwing until it’s tight. Push down the toilet cover, and you’re all done.
Replacing the Seat
The other alternative to tightening a loose toilet sear is to simply replace the seat. In other cases, you will find the bolt isn’t tightening itself, or the hole where you’re supposed to pass the bolt through has widened, moreover, the nuts could be hidden in the porcelain forcing you to cut them off. This leaves you with only one option, to replace your toilet seat.
For replacement, here are the necessary items you need.
- Toilet seat replacement kit
- Replacement nuts and bolts
- Rubber washers
- Hacksaw
Method
- Purchase a new toilet seat. This way the bolts can tighten better in case they were damaged. You could also purchase a new seat to get another seat shape. Choose between round or elongated toilet seat. Check the measurements to ensure they fit with the toilet bowl perfectly. You could also choose between plastic and wooden toilet seats.
- Unscrew the old toilet seat and fix it in the new seat. Add in the bolts and ensure they pass through correctly. Now.
- Add in the nuts underneath the toilet. The nuts are used to help tighten the bolt into place.
- Align the toilet seat. Especially if you went to a wooden seat, you really have to adjust it to ensure it’s not wobbly even after tightening.
- Tighten and enjoy your new seat with new bolts.
For bolts that don’t seem to tighten, may be frozen, or stuck, use the hacksaw blade to cut the bolt. Because the blade is very thin, it will easily for under the head of the bolt and snap it right out without scraping the porcelain of the bowl. Other types of hacksaws like the short handle or the mini-hacksaw can also be used for tight spaces.
Tighten Toilet Seat with Concealed Fixings
Suffice to say, some toilet seat bolts are usually hidden Under the plastic flap once you cover the seat. Ordinarily, you won’t locate it’s bolt unless you expose them from underneath the plastic flap. In such a scenario, here’s what to do.
Supplies
- Flathead screwdriver
- Pliers
- Ratchet or adjustable wrench
Method
- Use a screwdriver to pry open the plastic flaps. This will expose the bolts.
- Using the slotted heads on top of the bolt, take the screwdriver and turn clockwise in an effort to tighten the toilet seat. Do so until the bolt tightens.
- If not, locate the nut underneath the toilet seat and use pliers to hold it in place. A ratchet wrench with a deep socket is usually the easiest way to tighten these bolts, but an adjustable wrench can also be used.
Toilet Seat Tightening Kit
A toilet seat tightening kit has all the necessary items you need to add friction and enhance the grip between the bolts.
More often than not, the loose and wobbly seat is because the space, where the bolt turns, has widened, making it impossible for you to tighten it adequately.
This kit bought in several home improvement centers and online retailers includes rubber washers, wrenches, and mounting nuts.
The rubber washers are fitted under the bolts to coat/hide or remove any extra spaces that hinder the seat from aligning and tightening.
Specialty wrench is also included because it fits most if not all the toilet seats. In case you didn’t have a wrench, this kit can aid you.
To use the items in the kit;
- Remove the nuts from underneath the mounting bolts.
- Slip the rubber washers on the bolts from underneath the toilet bowl.
- Loosely begin to thread back in the nut while still ensuring alignment of the seat.
- Use the specialty wrench to tighten the bolts further.
- Keep on with the process until you get your desired results.
Toilet Seat Stabilizers
The toilet seat could easily be wobbly because it can’t get stable. You check the bolts and they are tight as ever, leaving you to wonder why else your seat isn’t stable. Here, you simply use a toilet seat stabilizer.
A good example of one toilet seat stabilizer is the safe T-Bumper installed between the toilet bowl and the toilet seat. This is best done by a professional, however, you can do it yourself.
- Get the rubber band from the kit and loop it around the toilet seat.
- Place the stabilizer in the middle of the toilet so they touch inside the rim of the toilet bowl at the midsection.
- Drill a hole where you will secure the stabilizer and use the screws from the kit to stabilizer the seat.
- Once they are fit, try seating to ensure the seat is stable again.
The purpose of the stabilizer is to center the toilet seat. This way, it won’t wiggle left to right all the time.
Tips to Prevent Loosening
Here are a few tips you can use to prevent the toilet seat from wobbling or loosening quicker.
- Increase friction around the bolts. The material of the bolt can jeopardize how tight or loose the toilet seat will be. Because others can be self-lubricating, it’s slippery and becomes loose often.
- Apply PTFE (Teflon) plumbing tape to the bolt threads. Teflon is a lubricant that can also be used to increase resistance between the bolt and the porcelain. This way, there won’t be much movement and less loosening. Just wrap about three to five layers of thread around the nut and tighten it clockwise to the end.
- Check on the material of the nut. The best ones are made with brass or aluminum. They are more aggressive, rigid, and sturdy. Just use the soft washers to prevent any damage to the porcelain.
- Washers too can be used to decrease movement of the toilet seat. Rubber washers add grip between the seat bolt and bowl.