Toilet Handle Loose – Troubleshooting & How to Fix
It is said that a single person can visit the toilet between three to nine times a day. That’s an average of six flushes in one day. Owing to the fact that is a movable part the tank, it is likely to loosen at some point…too loose to even flush.
The most obvious reason of loosening is wear and tear. The handle can also slack due to a disconnection or unfastened chain inside the toilet tank. You can simply fix this problem by replacing the handle, reconnecting the chain to the handle so it can gain pressure from the flapper underneath. You can also tighten the handle mounting nut that can loosen up due to frequent flushing.
Following are is a guide to deal with issue plus ideas to prevent and keep you handle firm and working.
Why is the Toilet Flush Handle Loose?
A slack flush handle is one that jiggles by itself without tension and in most cases won’t flush properly. As mentioned earlier your toilet tank handle can be loose because of any of the following
- A loose chain/ arm
- Loose nut
- Aged or old handle
Although the handle can be loose for multiple other reasons because the toilet tank features numerous components and any one of them could be faulty, your troubleshooting should start from the three parts of the tank.
How to Fix It
The first step to troubleshooting and fix the issue is by opening up the lid that covers toilet tank.
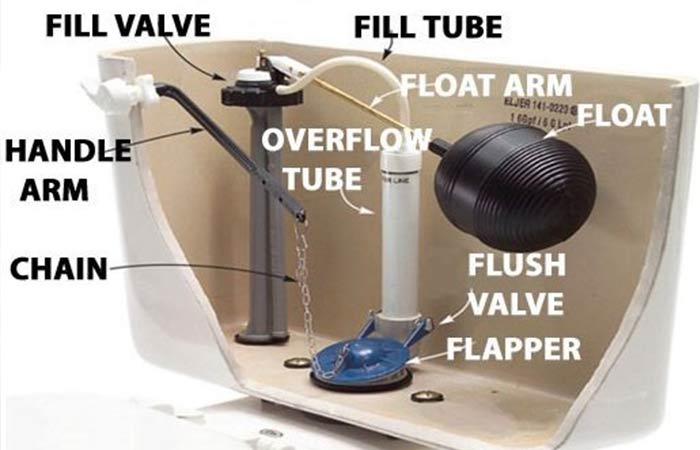
Once you open the top part of the toilet tank, you will notice the handle from the inside is hooked to a valve called the flapper which opens up a leeway for water to get in.
Once it’s in, the water will lift the float lever that rises the arm/ lift chain which then resets the handle to its usual upright position.
Fixing the Loose Chain
This is a very easy problem to fix. If you notice the chain is a bit snug, just reconnect or attach the wire to ensure it’s holding on to the flapper underneath. This should instantaneously tighten the grip of the handle.
Fixing the Loose Nut
If the handle mounting nut is loose, you’ll need to tighten it. Here’s a step by step guide on how to do that.
- Remove the lid from the toilet tank and set it aside safely.
- Turn off water to your toilet either through the immediate shutoff valve or the main shutoff valve.
- Empty water from the tank so you can easily place your hand or hands inside the tan without the distraction of water.
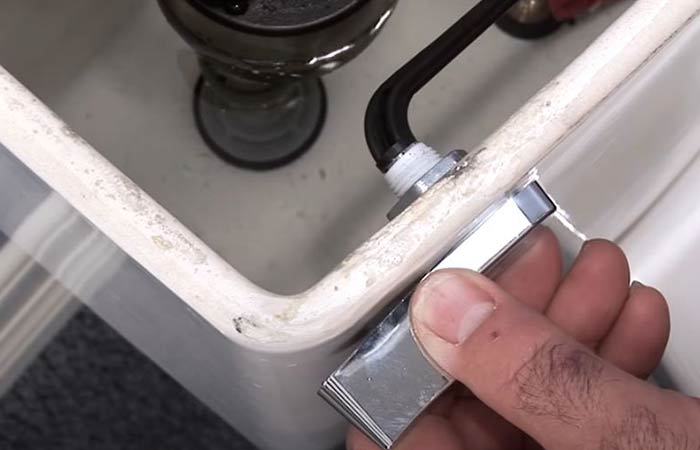
- Once ready to begin, look inside the tank and locate the metal nut directly adjacent to the handle. It should be directly opposite the handle (behind the porcelain).
- Take an adjustable wrench and try to turn the nut in a counterclockwise direction. Regulate your speed and tension until it’s snug. Using too much force can cause cracks on the porcelain or even break the handle.
- Test out the handle to confirm it’s well tightened.
If not there’s probably something else wrong with the handle, but it’s probably best to consider replacing the entire handle. This way if there is something wrong, then the handle is ruled out completely. Here’s a guide on how you can replace your toilet handle.
How to Replace a Toilet Handle
Have a good look at your handle as there are diverse options to choose from. Is it metal or plastic? What’s the design? Model and make? Any brand names? Note down all these details before heading out to your nearest hardware store.
If you don’t find what you’re looking for, a universal handle will work just fine
- Start again by opening the cover to the tank and look inside for the chain dip. Before you remove the handle, you have to disconnect the lever that attaches the handle to the flapper.
- Undo the clasp to disentangle the handle.
- Remove the mounting nut. Now instead of tightening as you’re doing above, keep loosening it until it comes off. Use a pair of pliers to unscrew clockwise.
- Pull it out and fit in the new handle. Before you throw out the old handle confirm the new fits the space well.
- Unscrew the mounting nut to the end to remove it. Only do this if you have a replacement nut. If not, just use it to screw in the new handle.
- Tighten the nut to the end to ensure the handle is well snug. This is done counterclockwise.
- Reattach the chain into the holes of the lever. Ensure the distance is right, not too tight, and not too loose as this presents another toilet problem.
- Open up the shutoff valve to allow water in. Once it has filled the toilet tank, test out the new handle. Flush the toilet as you feel for the tension or resistance. If it sounds well, then you’re done.
Ensure there’s no rattling or jiggling as this means the handle isn’t tightened enough and could still get loose sooner or later.
What Should I Do If Toilet Handle is Loose and not Flushing?
If there’s no flushing, it simply means the handle is too loose until there’s no more pressure to initiate a flush. This means there’s a disconnection with the flapper valve that’s supposed to open for water to get into the toilet.
Your first course of action should be to turn off the water supply to the toilet using the shutoff valve. Empty the toilet by manually lifting the lever to open the flapper. Now you should be free to look inside the tank for any errors.
- Repeat trying to flush the loose handle to see where exactly there’s a disconnection. The arm lever on the other side of the handle should lift the chain in turn opening the flapper and initiating the flush.
- Look at all these components to ensure they are tightly fixed and connected.
- One problem you may note is there’s too much slack in the lift chain. If it’s loose, there will be no pressure to lift the flapper high enough to release water for a flush cycle.
- Adjust the chain length to just one inch approximately from the lever this way once you flush it will open the flapper completely.
- Also, check the integrity of the handle. A loose handle can easily mean you’re not initiating the handle, to begin with. Because the handle is fixed by reverse-threading, just tighten the nut by turning counterclockwise.
- Lastly, check the base of the tank where the flapper is to confirm the lift arm is also well connected to the flapper. This way once you push the handle down it moves up automatically.
- Untangle, adjust, and reconnect as needed.
- Check the other parts like the flush valve to ensure it’s well sealed by the flapper.
From these guidelines, you will notice that the problems come from three areas, the lift arm, the chain, or the flapper. All these components can be replaced if they can’t be adjusted to function properly. If the flapper is damaged or warped, it may cause an issue again in the future so it’s best to just replace it.
If you’re unable to fix the above issues, seek assistance from a professional plumber who’ll do the work for you.
Tips to Avoid Looseness
The handle will wear out after frequent use, that’s a given. However, there are ways you can avoid having a loose toilet handle now and then. Here are some tips you can use;
- Avoid exerting too much force on the handle. The handle may be made from metal but the components inside are light and mostly made from plastic which means they can easily break.
- Fix the loose handle as soon as it becomes loose. When you keep forcing it to work or flush you’re just causing more wear around the handle.
- Replace the mounting nut often to keep the handle always tight and ready to flush.
- Regular checkups inside the toilet tank won’t hurt as well.
After fixing the loose handle, however, you should worry much about the handle again. If the handle loosens faster than you anticipate, a replacement would be the best long term solution to the problem.
Further Reading