Caulking Toilet-How to, Best Plastic & Clear Caulks
Caulking is the process of adding a watertight sealant on seams and joints to prevent and repair damage or home wear. Caulking is mostly done on gaps on the windows, doors, baseboards, and other areas of the house, but it can also be done around the toilet.
Caulking is beneficial to hiding gaps, preventing leakage around toilet seats, and even for cosmetic reasons. On rare occasions, it can also be used to prevent water from leaking at the base of the toilet, which is also why it has to be watertight. It’s very easy to do and can last for quite some time.
If unsure about whether you should or shouldn’t caulk around your toilet, this shall explain why you should caulk and how to it by yourself.
Why Should You Caulk Around a Toilet Base?
There are four reasons you should caulk your toilet base;
- Aesthetic appeal – caulking allows you to seal open gaps between the floor and toilet. There will be a smooth coating between the surfaces which adds appeal to the toilet, especially if well installed.
- Caulk can curb foul scents – water can hide in between the gaping causing it to form an unpleasant smell. Caulking with the waterproof sealant will eliminate spaces where water can settle.
- Stability – adding caulk can also securely fix the toilet in place just as bolts would do. As the caulk is fitted in between gaps, it creates a seal between the floor and the toilet keeping it securely based on the ground.
- Code requirement – several states are guided by the plumbing code under section 402.2 that states “Where a fixture comes in contact with the wall or floor, the joint between the fixture and the wall or floor shall be made watertight.”
How to Caulk
Preparation
The first step is to get yourself ready to caulk.
- Remove old caulk around the toilet base, if any. You can either use caulk removals tools bought at home improvement stores or simply use a razor knife. Loosen a section of the caulk and pull it out as one long strip. Commercial removers can be used to ease the work, but be wary of floor damage.
- Clean the area completely and get rid of any dirt, debris, rust, or paint chips. For a pleasing result, you want to have a clean area to work on. Use rubbing alcohol, soap, and water to clean and disinfect the area.
- Dry out the area before anything else. If the region doesn’t dry out, it could mean there’s a leak and you need to replace the wax ring before proceeding to caulk. The floor or toilet base should never be wet during application as the area will remain damp and can cause damage to the flooring.
- Balance the toilet either by tightening its bolts or using plumbing toilet shims to level it. Loose or uneven toilets make the caulk appear loose and unappealing.
- Lastly, use masking tape to cover the non-covered regions. Just as you would during painting, the masking tape will guide for clear lines and prevent caulk from getting on your floors. The tape should cover all around the toilet for sufficient coverage.
Application
- Take the caulk of your choice, latex or silicone, white or clear, and insert it into the caulk gun. Silicone caulk is stronger, durable, and more wear-resistant than latex and acrylic caulk, but the choice is yours.
- Cut the tip from the caulk tube and puncture the end with the metal rod attached to the gun. While the tube holds the sealant, the gun is what allows you to paint around the toilet.
- Confirm all the parts are properly aligned including the plastic body that holds the tube, the plunger that holds up the caulk, and the metal release that triggers the caulk to paint.
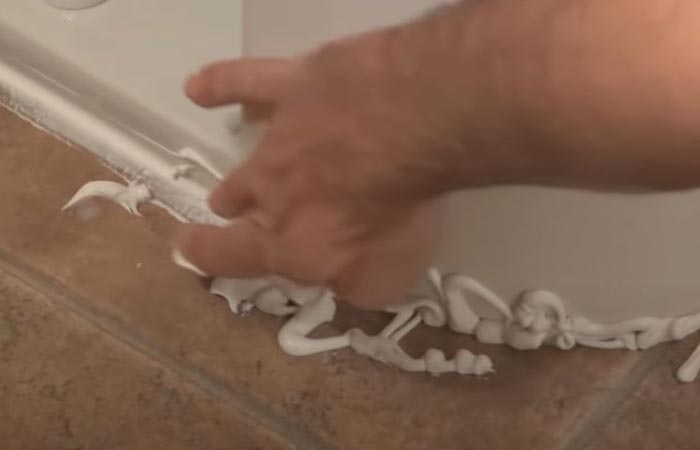
- With everything in place, pull the caulk gun along the application joint(the gap between floor and toilet). It should be at a 45° angle and with steady pressure all around the toilet. This way, the paint will appear smooth and ensure a better seal.
- For further reinforcement of the seal. Use the other hand not holding the gun to push the tip of the tube closer to the gap to ensure it fills the space. Ensure steady hand movements for a more consistent seal.
- If you need to rest, look for a piece of cardboard or cloth to place the gun onto to ensure any caulk dripping from the gun doesn’t spoil your floors
Note: The gun is not a necessary tool to have, you can dispense the caulk directly from the tube and onto space. This will offer you even better flexibility during application.
Finishing
After application, you need to clean up and clear out. Get rid of any messes and store any remaining caulk appropriately.
- Start by scooping up any excess caulk from the floor. Using your finger, push the caulk deeper into the joint for more bondage. This way any excess can easily be scooped up.
- If you don’t want to use your fingers you can wear protective gloves or use masking tape to push against the caulk. Just remember to remove the tape before the caulk cures or gets tacky.
- Caulk finishing tools are also available if you want a cleaner look. However, the extra expense isn’t necessary.
- Peel off the masking tape from around your toilet base. If it has caulk droplets, be careful not to drop them on the floor. The tape shouldn’t leave any sticky residue.
- Take a sponge, water, and soap. Use it to clean out the toilet in general. Use the sponge alone to pick up wet caulk. If it’s already cured, the water and soap will clean the caulk as well.
- Allow the caulk to fully cure. Anywhere between 30 minutes and 24 hours. To hasten, expose the caulk to a lot of oxygen as this will dry it up fast. Avoid heat as it may wear down the caulk.
- Use mineral spirits or rubbing alcohol to clean your hands as you’re done caulking.
White or Clear Caulk around the Toilet?
Caulk can come in a variety of colors. Pink, blue, green, clear, or white. Many people prefer either choice as it’s the least noticeable. Silicone caulk, more often than not, is clear unless it’s a blend like siliconized latex caulk which then comes in different shades. Latex caulk is white and often has a variety of colors to choose from.
Both caulks do a great job with adherence. However, the difference comes in with the tiny details. Let’s have a look at these differences.
What are the Differences and Which is Better?
Latex Caulk
- Also called the painters caulk as it’s paintable and very easy to apply and reapply.
- White in color but can come in an array of colors
- Cleans easily with soap and water
- Tends to weaken in extreme weather conditions and temperatures such as the extreme sun.
- Can be used in both porous and non-porous surfaces such as wood, drywall, plaster, metal, fiberglass, and masonry
- Best for constant gaps.
- Dries faster
- Ideal for indoors due to lack of odor
- Can be concealed under paint
- Wears out in extreme temperatures.
- Can be combined with acrylic for longevity and flexibility
Silicone Caulk
- Has a clear appearance
- Best for nonporous surfaces that expand and contract easily. Can also be used on constant gaps.
- More flexible in terms of application. You can apply it on wet, frozen, and in extreme temperatures such as the sun.
- Most are UV resistant
- They have a strong odor
- They last longer and have better elasticity
- Requires mineral spirits to clean
- May be difficult to apply/ paint unless the label says otherwise
From the comparison above, silicone caulk overpowers latex caulk by being more durable, highly elastic, and able to withstand and resist wear and tear in extreme temperatures. It’s great for tough jobs and can last longer than the other type of caulk. Being clear, it’s also unnoticeable, making it great for the outdoors.
Unfortunately, because you can’t paint silicone caulk, you will end up with a messy job that’s difficult to clean up. Manufactured by reducing silica sand into a basic silicone oil polymer and adding fillers such as mica (a mineral) and clay, it’s limited to non-porous surfaces only like metal and glass. Moreover, you can’t wash it up with just water and soap, you need mineral spirits.
Hence, the better option for this case is the latex caulk. You can paint over it, clean it at often as you want, apply and reapply with ease, plus its fillers are very adhesive to porous and nonporous surfaces including porcelain used in the making of a toilet.
Best Caulks
The best caulk is made of 100% silicone or can be a siliconized latex/acrylic because they offer the best adherence to any material. Be it porcelain, stone, fiberglass, glass, or ceramic. Pure silicone is more durable and you won’t have to consider painting after the job is done. It’s flexible, waterproof, rot-resistant, and rarely cracks with thermal expansion.
Blends of silicon and acrylic caulk offer similar results, and may be easier to apply, but they aren’t as long-lasting and strong in the application as the former. To emphasize further on the best caulks, here are three of the best available in the market.
Sashco 10016 Big Stretch Caulk
From an 84-year-old company. Sashco promises to deliver quality time and time again. Their 10016 big stretch caulk weighing just 10 pounds offers no exception bug the best. It comes in seven different colors including the most common – white.
Features
- All in one applicator – used for both interior and exterior projects, it has no limits. Not only the toilet baseboard, but also windows, seals, vents, and walls.
- Super elasticity to over 500% its original size
- Great flexibility – the caulk doesn’t crack just stretches, twists, bends, and compresses.
- No slump after application
- Sealant is waterproof
- Low odor
- Paintability
- Freeze-thaw stability
Pros
- Impeccable elasticity
- Durable
- Easy to clean once cured
- Available in an array of colors
- Versatile in use easy to maintain
- Used in the interior and exterior
- Available in a clear color
- UV resistant
Cons
- Dries too fast
Gorilla Silicone Sealant Caulk
The Gorilla Silicone sealant is 100% silicone offering nothing but the best of silicone. Budget-friendly and fast-drying, it’s been the leader in the market for a long time.
Features
- 100% silicone – making it durable and suitable for both indoor and outdoor projects.
- Complete package with a 10-ounce cartridge
- Waterproof sealant with a fast-drying system of just 30 minutes.
- Readily washed and wiped with water after curing.
- Long-lasting clear white color – doesn’t yellow over time
- Mold and mildew resistant
- No shrinking nor cracking
Cons
- Only available in white
- Very little in the pack enough for only one toilet.
XTREME Bond Adhesive Caulk
Xtreme Bond’s caulk is yet another excellent adhesive caulk with three times the strength of one adhesive. It offers a permanent fix for your toilets and other potential problem areas.
Features
- Super sticky in substances making them adhere faster than any other adhesive caulk.
- Complete packaging with a set of three 29-ounce cartridges, which total to 87 ounces.
- Three times stronger bondage than regular adhesives.
- Quick adhesion even on wet and frozen surfaces.
- Fast-drying across all temperatures with the ability to wash and clean after curing.
- Can be used to add stability to a rocking toilet.
- Can be used for interior and exterior projects, more especially indoors due to low odor and low VOC formulation
Pros
- Suitable for use anywhere
- Weather-resistant
- The caulk is more than enough to caulk a couple of toilets
- One year shelf life
Cons
- The seal is too tight much so it can damage the toilet or the flooring
- Priced under high-end products