How to Adjust a Toilet Fill Valve(DIY)
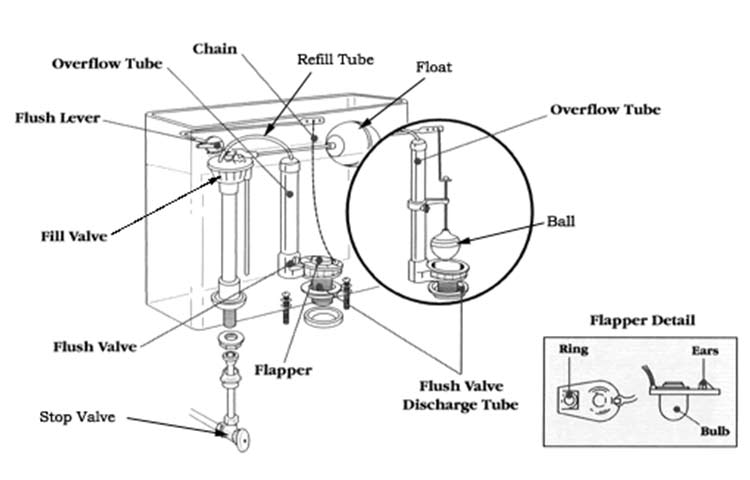
The toilet tank fill valve, also known as the ballcock, controls the flow of water into the toilet tank. It works by opening up to allow the water in and shutting off the water when it reaches a certain set level. This way, the toilet tank always has water ready for the next flush.
At times, the fill valve needs adjustment as its mechanisms may not be working as needed. The water may not be flowing in, it may be overflowing, the water may not be flowing in to the desired level or other issue.
There’s no one way for adjusting the fill valve or fixing these issues as there are different types of fill valves. Each of these valves requires a different approach as shall be seen in the sections below.
Tools Needed
You’ll need the following tools:
- Screwdriver
- Penetrating oil
- Pliers
Most of the adjustments can, however, be handled with your bare hands.
Fill Valve Types and their Adjustments
Before you start adjusting the water level, you should first shut off the water supply then flush the toilet to empty the cistern.
The main types of fill valves and how to adjust each one are as follows:
1. Diaphragm Fill Valve (Brass)
The diaphragm fill valve has a valve with a diaphragm seal connected to a flat rod and ball. When the arm of the lever is moved such as during the flushing of the toilet, a button is moved at the top of the valve body. This button moves the diaphragm thus controlling how water flows.
To adjust the water level in the toilet tank, simply bend the the brass road upwards for more water and downwards for less water. When bending it upwards, ensure it keeps the water level within the set limit to avoid overflowing.
If the valve cap is made of brass, there’s a likelihood that the accumulation of mineral deposits can make it stuck in one position. When this happens, the fill valve can either remain closed or open. To return it to its usual status, add penetrating oil on the valve housing then move the rod up and down until the button is let loose and in working condition again.
2. Piston/Plunger Fill Valve
The piston or plunger fill valve setup is the origin of the name ‘ballcock’ and is among the most dependable types of fill valves. It is however slowly being phased out by newer models.
In this setup, the a horizontal brass float rod has a ball attached to its end. This road moves up and down to raise and lower a piston or plunger with the result that it either stops or starts the flow of water into the toilet cistern. To prevent the continued flow of water into the cistern, the piston or plunger has a washer or O-ring to provide a tight seal around it.
Adjusting this type of fill valve is easy as it only takes a little bend of the brass rod either upwards or downwards. The upward bend, which moves the ball upwards as well, is meant to allow in more water into the toilet cistern/tank. The downward bend, which results in the ball moving downwards, is meant to allow less water into the cistern.
No matter the direction you will be bending the rod, ensure that the new water level is within the stated limit. Exceeding this limit will lead to leaks as the tank will be overfilled.
3. Float-Cup Fill Valve
The floating cup fill valve, also called the floatless fill valve, is the most common type of fill valve at the moment. Most new toilets come with this type of fill valve given its high level of reliability and low costs.
The whole mechanism is contained in one piece with the floating cylinder moving up and down the fill valve shaft. How high the cylinder goes depends on a stopper at the top of the fill valve shaft. This stopper is simply a metal spring clip.
To adjust the level of the water in the tank, there are two methods to do so:
- In one method, you pinch on the ends of the metal spring clip to loosen it. You then raise it or lower it to raise or lower the water level respectively. Once you’ve attained the level you need, release the clips of the metal spring clip.
- Some versions of this float-cup fill valve instead use a plastic screw mechanism that can be turned in one direction or the other to raise and lower the level of water in the cistern.
Again, keep the water level below the overflow tube to avoid leaking.
4. Diaphragm Fill Valve (Plastic)
Just like the brass diaphragm fill valve, the plastic version of the diaphragm fill valve uses the same setup whereby a lever moves a plastic button at the top of a valve. The valve then moves the diaphragm mechanism to control the flow of water.
For this type of fill valve, there are two ways to adjust the water levels:
- Bending the brass rod up or down to raise or lower the water levels. The bending should be slow and gradual to avoid damaging the rod permanently.
- Turning the adjustment screw on the valve’s top anti-clockwise to raise the water level or clockwise to lower the level of water in the toilet tank. For this option, you’ll need a screwdriver. Most fill valves work with the flat version.
For either method, always keep in mind to leave the water level below the overflow tube of the toilet tank.
5. Pressure-Activated (Floatless) Fill Valve
Another floatless fill valve is the pressure-activated type which is the true floatless valve as it doesn’t use any floating mechanism to fill the toilet tank. Instead, the valve senses the amount of pressure in the tank then determines when to shut off the inlet and when to keep it open.
To adjust the water level, there’s an adjustment screw on the top of fill valve which can be turned in the clockwise or counterclockwise directions. You turn it clockwise to raise the level of water and anti-clockwise to lower it.
The problem with this kind of fill valve is that it may lead to the siphoning back of dirty water back into the clean water supply. Also, the pressure sensor may fail leading to an overflowing toilet tank although this isn’t common.
6. Internal Float Fill Valve
The internal float fill valve, also called the QuietFill valve, combines the fill valve and the floater mechanism with the floater located inside the head of the fill valve. Its working mechanism is just like that of the float-cup fill valve although it’s less noisy and more accurate in shutting off the water at the designated level.
To adjust the water level in the tank, the whole fill valve head is first twisted anti-clockwise to release it then pulled up to raise the water level, or lowered to lower the water level. After that, you turn it in a clockwise manner to lock it in place.
When done with either of these solutions, make sure there are no debris in the toilet tank as they may tamper with the proper working of the tank. Open the water inlet to check whether the new level is the right one or not. If not, repeat the process to attain the right water level.
If, after the adjustments, you still feel that the initial problem hasn’t been solved, it’s time to investigate another problem with the other parts of the toilet flushing system.