How to Adjust Water Level in the Toilet Bowl
The level of water in your toilet bowl or tank plays an important role in determining the toilet’s functioning. High water level leads to overflowing, while low levels cause a weak flush, which leads to clogs or blockages. Having the right level is crucial to ensure that your toilet works properly.
To adjust the water level in the bowl, simply calibrate the float valve or ballcock to the right height. If the float or fill valve is worn out, replace it with a new one. You can also inspect your plumbing system for any blockages that may cause too much water to stay in the bowl.
While toilet fill valves and floats have the same purpose, it is important to note they operate differently depending on the type and brand, hence the adjustment instructions can differ. The following is an in-depth look into how you can adjust the water level for common toilets, and dual flush, toilets with fluid master other specific brands such as Kohler, Toto, and American Standard.
Lowering Water Level in Toilet Bowl-Too much/ High Water Adjustment.
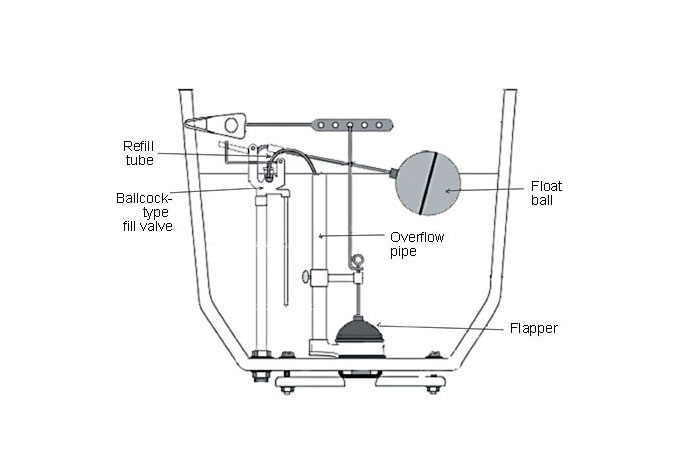
Before doing any adjustments, it is important to note the correct water level in the toilet tank is one to two inches (2.5 to 5cm) below the fill valve or overflow tube.
The water level in the bowl is determined by the height of the weir, a section of the s-shaped tube(siphon) behind the bowl. Check the illustration below.
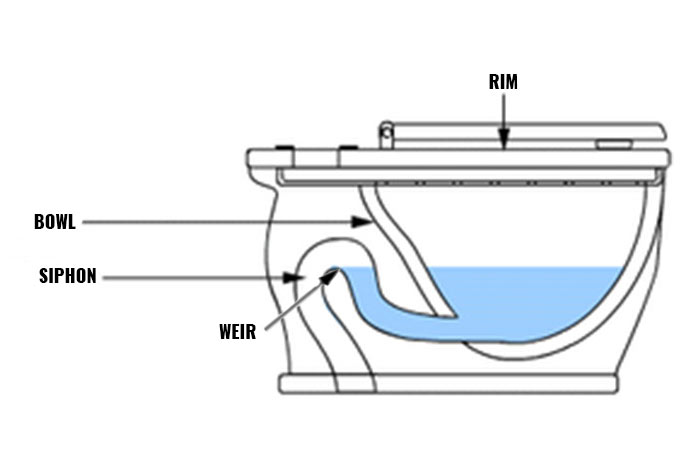
Once the bowl fills with water after a flush, the excess water flows over the weir and down into the drain. Any remaining water stops at the weir level in the bowl.
Therefore, the right water level is usually at the weir. The higher the height of the weir the higher the level of the water in the bowl.
Unfortunately, there’s not much you can do to adjust the bowl siphon tube once it has been installed. Adjusting means uninstalling the toilet bowl and probably doing some floor work. The most practical fixes are to adjust the tank components or remove clogs, as discussed below.
Further Reading: Low Water Level in Toilet Bowl-Causes & Quick Fixes
Adjusting the Ball and Arm Float Types
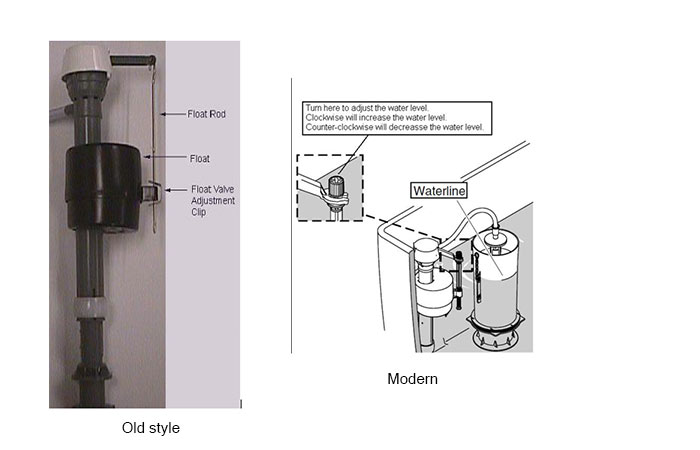
These types of old fill valves are operated by a floating ball attached to a horizontal brass or plastic float rod. The rod raises or lowers to start or stop the flow of water to the tank.
If you have too much water, follow the steps below to lower the level.
- Remove the tank lid by lifting and setting it aside on a stable surface.
- Check the water level in the tank to make sure it’s within the right measurements. That’s one to two inches (2.5 to 5cm) below the fill valve.
- Turn off the water supply either from the main shutoff valve or the one inside the house. Just locate it and rotate the known clockwise to seal.
- Flush to drain the water from the tank to the bowl.
- Check for damages on the fill valve. If it’s damaged, fix it or replace it with a new one.
- If the fill valve and parts connected to it are in a good working condition, gently bend down the brass metal rod to lower the fill level.
- For the plastic float rods, use a screwdriver to adjust the screw on top of the fill valve. Turn it clockwise to bring down the level of water in your tank.
- Reconnect the water supply to the tank, let it fill and check the level. Flush and look at the water level in the bowl.
- If the water is still too much, continue adjusting as needed to get the appropriate water level.
Adjust the Water Level Cylinder Float Types
These are newer and more efficient float varieties. They lack the traditional plastic/brass float rod and ball. Instead, they have a cylindrical plastic float that moves up and down along the fill valve shaft to control the flow of water into the tank.
The floating cup/device is attached by a plastic screw mechanism or a metal spring clip to a thin metal rod that controls the fill valve.
To lower the water level with these types of floats, follow steps 1-5 above.
Find the screw mechanism and turn it to let the float slide down on the actuating rod, then follow steps 8 and 9 above.
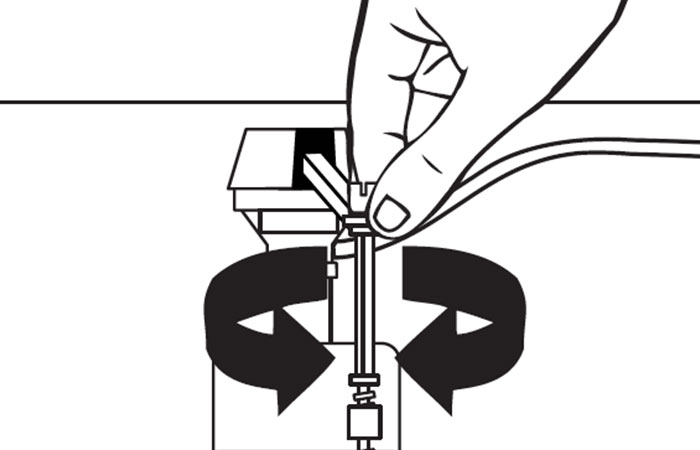
Some newer cylindrical float types, such as Korky’s QuiteFill, come with a hidden internal float lever inside the head of the valve. It works like a float-cup fill valve; the difference is the hidden lever.
To lower the water level, simply twist the top head of the fill valve counterclockwise to unlock it, move the entire head down.
Pressure-assisted Fill Valve
Sometimes referred to as floatless fill valves, pressure-assisted rely on pressure instead of float devices. These tanks have an underwater valve that detects the level of the depending on the pressure.
If the water is more than enough, turn the adjustment screw on the top of the valve anticlockwise.
How to Adjust Water Level in the Toilet Bowl – Kohler
Kohler toilets are some of the most popular and best-selling in the market today. This brand has unique toilets fitted with parts that work differently compared to other brands. Adjusting the level of water in your Kohler toilet depends on the time it was manufactured. The following are instructions for both the old and newer versions of Kohler toilets
To begin, remove the lid to the tank and check the water level and defects. Shut off the supply to the tank and flush the tank to allow you to work much better.
Older Kohler Toilets Adjustment
- Locate the float valve
- Use a pair pliers to squeeze the float valve adjustment clip (metal C-shaped clip) on the float valve
- To lower the water level, slide the clip down the float rod. Slide it up to raise the level.
- Flush the toilet to verify the water level is at the marked water line in the tank.
- Repeat Step 2 and 3 until you achieve the correct water level.
Adjusting water level in newer Kohler toilets
- Locate the float valve
- Using your hand or a screwdriver, turn the screw connected to the float arm counter-clockwise lower the float, which then lowers the water level. Turn the screw clockwise to increase the water level.
- Flush the toilet to verify the water level is at the marked water line. Make further adjustments if necessary
How to Adjust Water Level in Toilet Bowl with Fluidmaster
Although Fluidmaster fill valves come in different models, the process of adjusting the water level is similar. Assuming that there are no defects, the following are the steps to adjust the water level if you have Fluidmaster.
- Lift the lid to access the inside of your tank.
- Flush your toilet
- Using your hand, turn adjustment screw counterclockwise to lower water level or clockwise to raise
- water level
- Flush toilet and check new level.
- Repeat until you get the correct level.
Tip: When you twist adjustment screw 8 times – float moves 1/2”.
How to Adjust Water Level in Dual Flush Toilet Bowl
While most flush toilets have a single arm/button, dual flush toilets come with two buttons mechanism to flush different amounts of water; a lesser amount for liquid waste and a larger amount for solid waste.
The following are steps to adjust a dual flush toilet.
- Remove the dual flush lid by first unscrewing the push button on top of the lid. This may vary depending on the brand or model. Check the manufacturer’s instruction for further clarification.
- Use a screwdriver to turn the screw sitting on top of the fill valve clockwise to bring down the level. Turn it counterclockwise to raise the water level. Flush to check if the water is at the right level.
- If the screw method does not work, press together the two sides of the lock that attach the float valve to the fill valve assembly rail mounted on the side. This will raise the water level. Flush to check the level and make further adjustments if necessary.
- Replace the lid
How to Adjust Water Level in Toilet Bowl American standard
American standard toilets have fill valves similar to those of most modern toilet brands, hence the steps are similar.
Lift the lid, check the level, flush, then, using a screwdriver, turn the adjustment screw on the top of the valve. Turn the screw counterclockwise to reduce too much water; turn it clockwise to raise the water level.
Other Tips to Adjust Bowl Water Level
Replace Damaged Fill Valve and Flapper
The entire process of replacing a toilet fill valve depends on the type of toilet you’ve. For ball and arm types, you can replace the valve and the ball.
For the cylindrical types, most fill valves are universal, thus replacing should be quite easy. After successfully replacing the fill valve, follow the instructions above to get the correct water level.
A damaged toilet flapper or flush valve can also lead to a “phantom flush,” a condition when your toilet flushes itself. You may need to replace a flapper or the entire flush valve.
At the same time, a worn-out can fall out of place or fail to create a tight seal resulting in a continuous flow of water from the tank into the bowl.
Inspecting and Unblock Plumbing Vents & Pipes
Another none-tank-related problem that can cause unusual water levels in the bowl is blocked plumbing vents and pipes in your home.
Water will find it difficult to drain out of your toilet if there is a clog in your pipes. This results in a higher-than-normal water level in the bowl. Water flows out slowly and there can be an overflow in your bowl. The fix is to inspect and unclog your toilet with a plunger, a snake, or using any other appropriate DIY method.
The vents should be clear to allow air in. Without the air, the pressure within the vents will not be balanced. If the vents are completely blocked, air will not get in. All these mean poor flow of water in your home’s plumbing system.
How do you know that the vents are blocked? If your toilet gurgles and splutters when you empty the bathtub or flush a different toilet in another room in your house.
To clear the vents, find a ladder, get onto your roof and try flushing your pipes out with water from a garden hose. To avoid future blockages simply find a way to cover the vents to avoid dirt and debris from getting in.
References
- https://support.kohler.com/
- https://www.fluidmaster.com/wp-content/uploads/2017/03/400CARSP5_Instr_030217_ENGLISH.pdf